
This weekend, I started the work of installing and setting up my Raspberry Pi as a Pi-hole DNS sinkhole. This was inspired by some friends that have set up a Pi-hole for themselves, as well as the wonderful blog post by Troy Hunt.
Installing the Raspbian OS
I’m pretty sure it’s been about… 5 years since I last touched my Raspberry Pi.
Once upon a time, I had thought about using it to make a little NFS file system at home, but never really got the storage setup that I wanted to use to create the setup… C’est la vie..
Getting the Raspberry Pi set up turned out to be very straight forward, with very straight forward instructions that just worked. First step was to format the SD card, simple enough to do with the SD Card Formatter.
I ended up first installing the “Raspbian - Full” distro, but given I only had an 8GB SD card, I decided that wasn’t going to work out as well as I wanted, so I ended up uninstalling it and re-installing with the “Raspbian - Lite” version. That felt a bit snappier, and considering my intention is to leave the Pi plugged in with no keyboard / mouse / monitor, there was no real need to waste the space on the GUI installation.
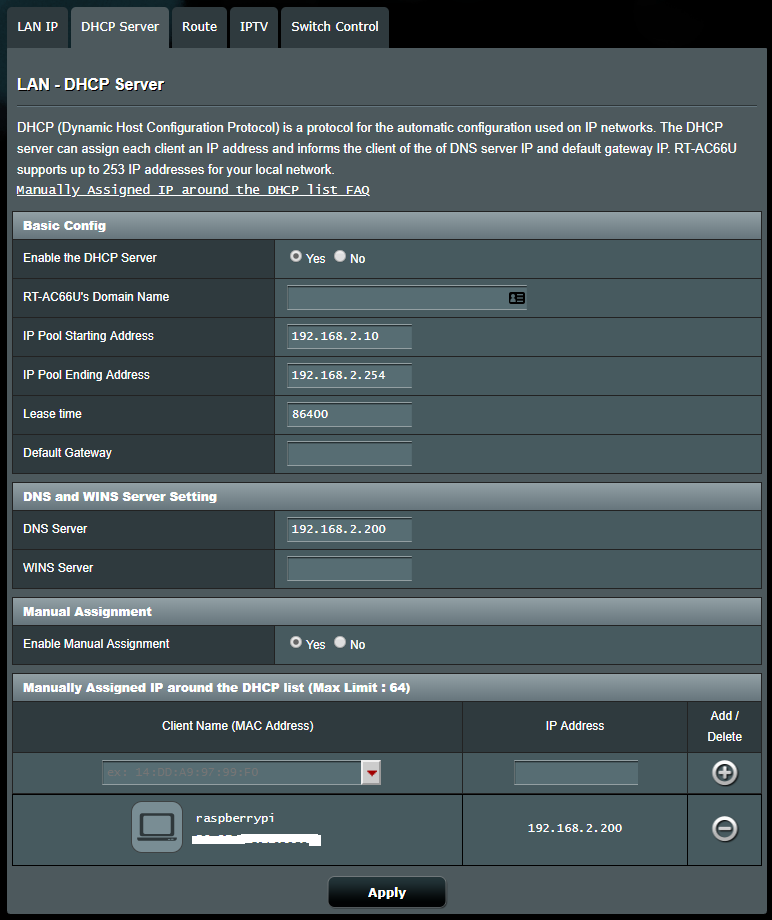
One configuration that I made in the network was choosing to set up my wireless router (which is my DHCP server) to reserve the IP address 192.168.2.200 for my Pi. This allowed me to simplify the setup after any re-installations that I was going to do (already clocked in at 2 in a day).
Installing Pi-hole
Actually installing the Pi-hole software was simple, based on the documentation on their site. It really boils down to:
curl -sSL https://install.pi-hole.net | bash
In my case, I ended up simply accepting all of the default values for the setup configuration, and in about 10 minutes I was done, and my Pi-hole was set up.
Later though, I did come back and switch from the default Google DNS (8.8.8.8) to the Cloudflare server (1.1.1.1), for fairly arbitrary reasons, that included having been staring at that address in several of Scott Helme’s blog posts.
Hooking it all together
In order to configure my network through the Pi-hole, I needed to configure my router to use the Pi-hole as the DNS server. This is very well documented in a number of places, including on the Pi-hole message boards directly.
Future Configuration
Here are a few interesting ideas for future configuration to do after this weekend to continue the Pi-hole adventure:
-
Scott Helme has an excellent blog post available on Securing DNS across all of my devices with Pi-Hole + DNS-over-HTTPS + 1.1.1.1 which I think would be really interesting to follow. (If nothing else, I like the idea of setting up Let’s Encrypt certificates for the admin interfaces of things like the Pi-hole admininistration page, and also maybe my router’s admin page).
-
And someday, maybe I’ll try to emulate the full Ubiquity based network hardware setups of Troy Hunt and Scott Helme. After reading those two articles, I am definitely interested, although I’m not sure I’m really doing enough to need much more than the single ASUS wireless router… Maybe some day.
Update: 2019-02-02
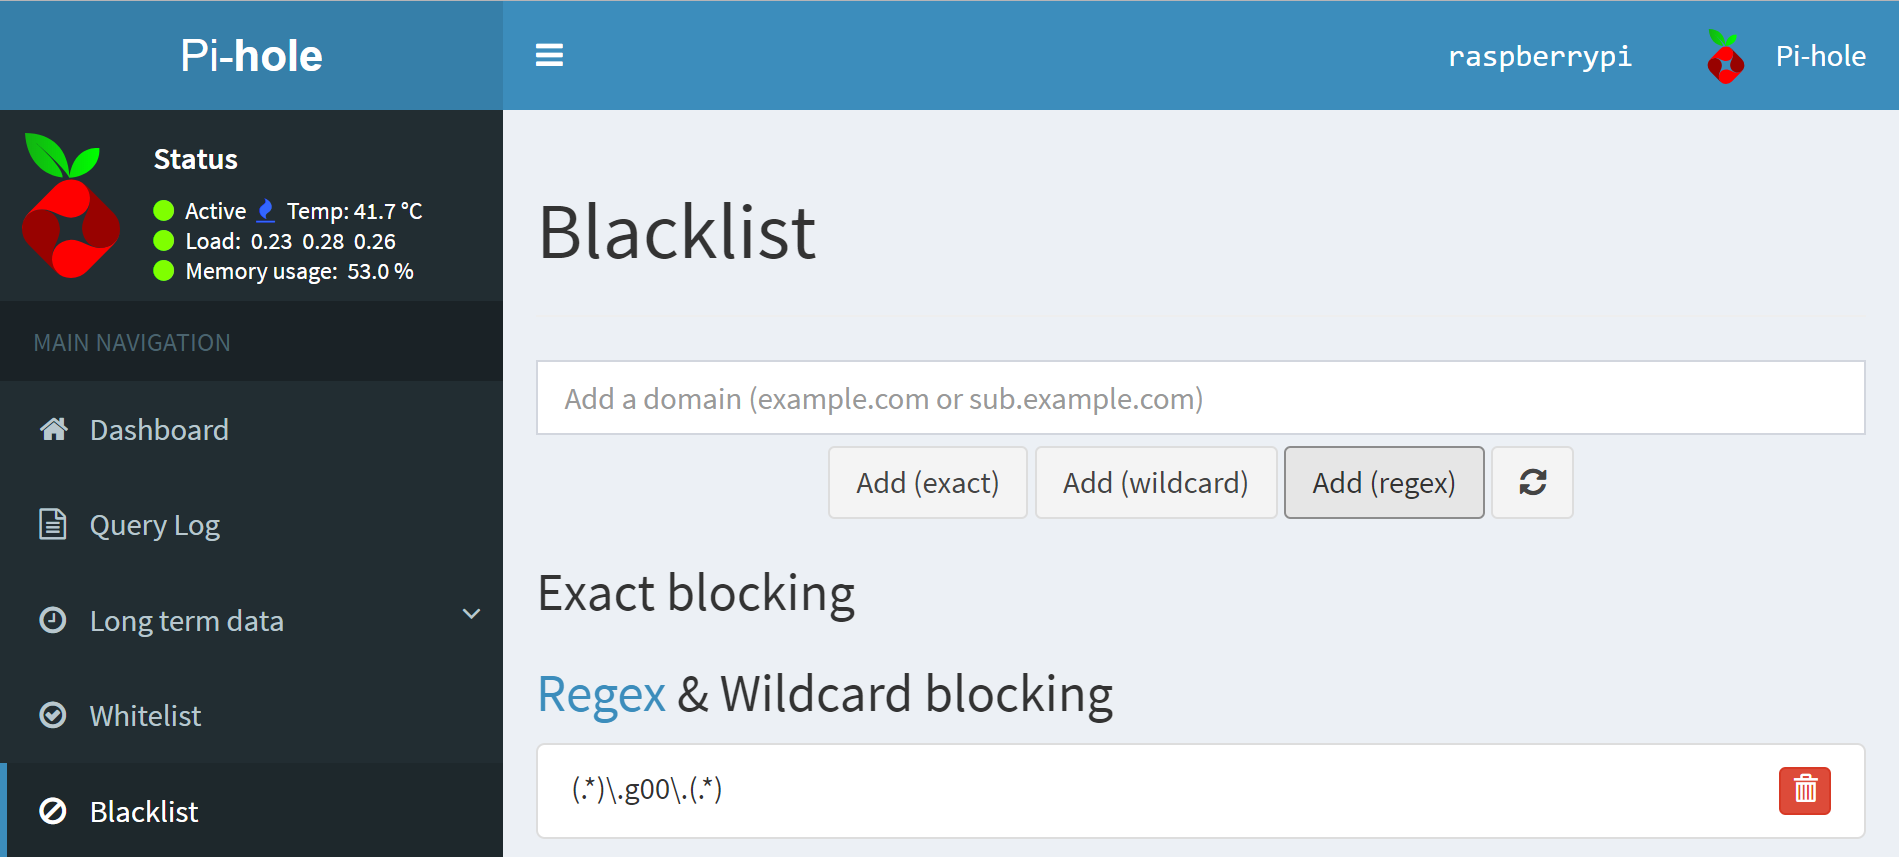
Browsing around this afternoon, looking for information about streaming the upcoming Superbowl game tomorrow led me to the cbssports.com website, which is apparently lousy with ads. But why wasn’t the Pi-hole blocking them…?
I did some digging around and ran across this thread on Reddit that provided the clue. Namely, that the site lists its ads via the pattern c-8xxxxx.g00.xxx or similar. This led me further down the thread to a solution, namely to add the following regex to the Pi-hole (.*)\.g00\.(.*) which seems to have solved the problem:
Comments